DIY Slantboard Woodworking Project
Published: Apr 23, 2024
For this project I created a slant board out of some leftover plywood from a previous woodworking project (DIY Plyo Box). A slant board is a simple piece of workout equipment that provides a stable, slanted surface to stand on. I became aware of the usefulness of the slant board by a fitness influencer focused on knee health known as kneesovertoesguy. One of the core exercises that he practices is a variation of the squat that specifically trains the knees and the VMO (Vastus medialis oblique) quadriceps muscle near the knee. This squat uses a slant board to work the knees at a greater range of motion to help keep the knees healthy and functional. Slant boards can be surprisingly expensive (I've seen some for more than $100!) for a couple of pieces of wood screwed together. So, I decided this would be a great opportunity to keep learning woodworking and to put together my own from scratch.
To learn how to make a slant board out of wood I studied a video by a Youtube channel called "Top Knotch". There are other videos on making a DIY slant board, but I thought this one was the most approachable for a beginner like me. He used plywood, which is what I had available, and he used accessible tools to build his slant board. Here is the video that gave me the overview I needed to build my own slant board:
To begin working on my slant board I gathered my materials. I was motivated to make this project partly because I had leftover plywood from building my own plyo box. I used a single piece of 8' x 4' plywood that is 3/4" thick for these two projects and I still have leftover pieces now, so it was a $40 well spent. The project also required wood screws, a drill, a saw, measuring tape, something to help draw straight lines, and sandpaper. I also wanted to add anti-slip tape to my board (which the Youtube tutorial video didn't have) so I bought a cheap roll of it off of Amazon.
Materials
- plywood (3/4"/19mm thick)
- wood screws
- grip tape (I got a roll of tape for ~$8)
- drill
- saw (I used a jigsaw for my cuts)
- tape measure
- sandpaper
The video tutorial I used provided precise measurements in a link in the description, but the link appears to be broken now. His measurements also were based on a thinner piece of plywood than the one that I used (mine is 19mm, his is 12mm). He used millimeters for his measurements. Thankfully I wrote down the measurements before his link went down (these are adjusted for 19mm thick plywood):
Board Measurements
- top board: 500mm x 355mm
- outside support boards: 320mm x 150mm
- middle support board: 301mm x 141mm
- back brace board: 462mm x 35mm

How I Made a Slant Board
To begin the process of building a slant board, I first marked out with a pencil my rectangular board pieces to be cut from my big piece of plywood. I drew out and made the cuts according to the measurements and plans above. I used a jigsaw to make my cuts, which is not ideal for cutting straight lines. I got it to work, but you will probably be better off with a tool better designed to make straight cuts like a table saw or a circular saw. When cutting the support triangle pieces, I cut out the rectangular dimensions and then cut a perfect diagonal line from corner to corner to make the even triangle pieces. I do not have a professional setup at all so I was making my cuts with a dumbbell weighing down my boards and resting them on a patio table. My slant board works well so it shows that you don't have to be anywhere close to perfect to make a functional piece of equipment.
Once I had my pieces cut out, I connected the back board to the three diagonal slanted pieces as shown in the tutorial video. I drilled the side triangle pieces from the side into the back board (parallel with the long length of the back board) which is why the back board isn't the same width as the big top board. The back board has 38mm (19mm times two) taken off of it to account for the thicknesses of the two side triangle pieces. The middle triangle piece is drilled in perpendicularly to the back piece though. The middle piece is a different size than the outside pieces because of its position relative to the back piece. It is 19mm shorter because of the back piece's thickness, and when cutting off that extra 19mm of the triangle the triangle loses height as well. The back piece is lined up with the bottom of my slanted triangle pieces to add more surface area with the ground. To join my pieces of wood with screws I first countersunk holes with a small drill bit to ensure that the wood didn't split when I screwed my pieces together. Then I drilled screws in the holes to complete the slanted frame of the slant board.
Once the frame was set up, I screwed in the top piece into the diagonal pieces that it rested on. Connecting the fairly thin diagonal support pieces from above through the top piece with screws was nerve racking. My slant board is wobbly when it is on a flat surface because my support pieces are not aligned perfectly in parallel. It was hard to know for certain if I was going to get the screws straight into the diagonal support pieces or miss entirely. I had to use my intuition. In future projects I would like a more precise method for aligning my boards precisely and for making sure that I'm drilling into the exact spots I'm aiming for. The wobble on my board totally goes away when I use it on a soft surface like carpet or a yoga mat, so thankfully it is still functional. The boards can be sanded down to reduce wobble also.
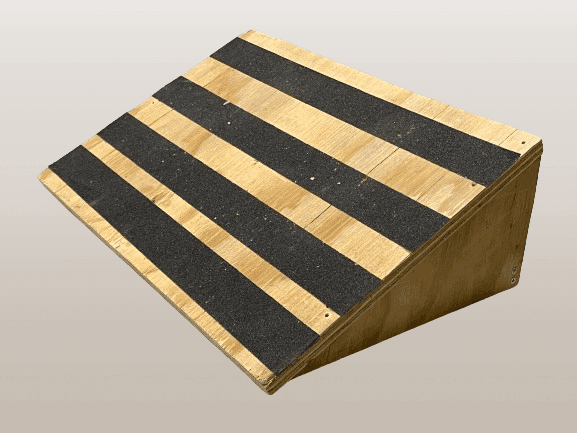
To finish the project off, I added some grip tape to my slant board to make it more stable to stand on without slipping. A roll of grip tape is very cheap to buy and it is very easy to apply. The grip tape can cover the screw holes for a seamless look too.
How to Make a Slant Board, In Summary
- Obtain a piece of decently thick and strong plywood (I used 19mm thick wood). You can get your local hardware store to make cuts for you if you want.
- If you are doing the cuts yourself, use a tape measure and draw out straight lines on your wood to mark out where you need to cut. Cut out your 5 separate boards according to the measurements provided above.
- Connect your back board (the thin, long piece) to your triangular support pieces to form the slant board's frame. The outside triangles get screwed to the back board from the outside (parallel to the length of the back board) and the middle triangle gets screwed in perpendicularly to the back board. Countersink holes into the wood before screwing together the boards.
- Align the top board to the slanted frame. Countersink and screw the pieces together along the length of the triangular pieces where they touch the top board.
- Sand any rough or pointy parts of the wooden slant board. If the slant board wobbles, you can sand down the bottom to reduce the instability or just use the slant board on a soft surface like carpet or a yoga mat to eliminate wobble.
- Apply grip tape to the board to prevent slippage while standing on the slanted surface. I applied four stripes of grip tape over the screws and along the entire width of the slant board to mine.
This was an easy and fun woodworking project. Slant board squats, calf raises, and jefferson curls are now a regular part of my workout routine, so I'm glad I made this simple piece of workout equipment for myself. I learned how to make a simple diagonal frame for a wooden structure that is extremely strong. This is my second project using the same $40 piece of plywood, so it was money well spent. I now have two pieces of workout equipment that I use regularly that I built with my own two hands. I learned some basic woodworking in the process. These projects have sparked my interest in D.I.Y. and hand made crafts and I am eager to explore more. It feels great to build tangible, useful things. I'm no expert tradesman, but I feel more confident and capable that I can build and fix things now.
Here is a video demonstrating some uses of a slant board: