DIY Plyo Box
Published: Jun 28, 2023
This plyometric box is my very first woodworking project. I didn't grow up working with my hands at all. I spent most of my time goofing around with video games and watching TV. I never operated an electric saw or used a drill. I didn't have any knowledge or curiosity about how the things around me were crafted or manufactured, and I was content to be a consumer of goods instead of a maker.
As I've gotten older I've become wise to the value in getting away from screens and engaging with the physical world. I've learned to love and crave sports, exercise, and being outdoors to counterbalance all of the sitting indoors and watching screens that I do. Even though I was brought up in school and at home to do knowledge work with books and computers, I've become increasingly aware of the beauty and value in physical trades and crafts. I think learning some DIY skills can be beneficial for pragmatic reasons and also for personal satisfaction. So I've decided to start learning some crafts like woodworking for myself. And what better place to start than by building a humble wooden box?
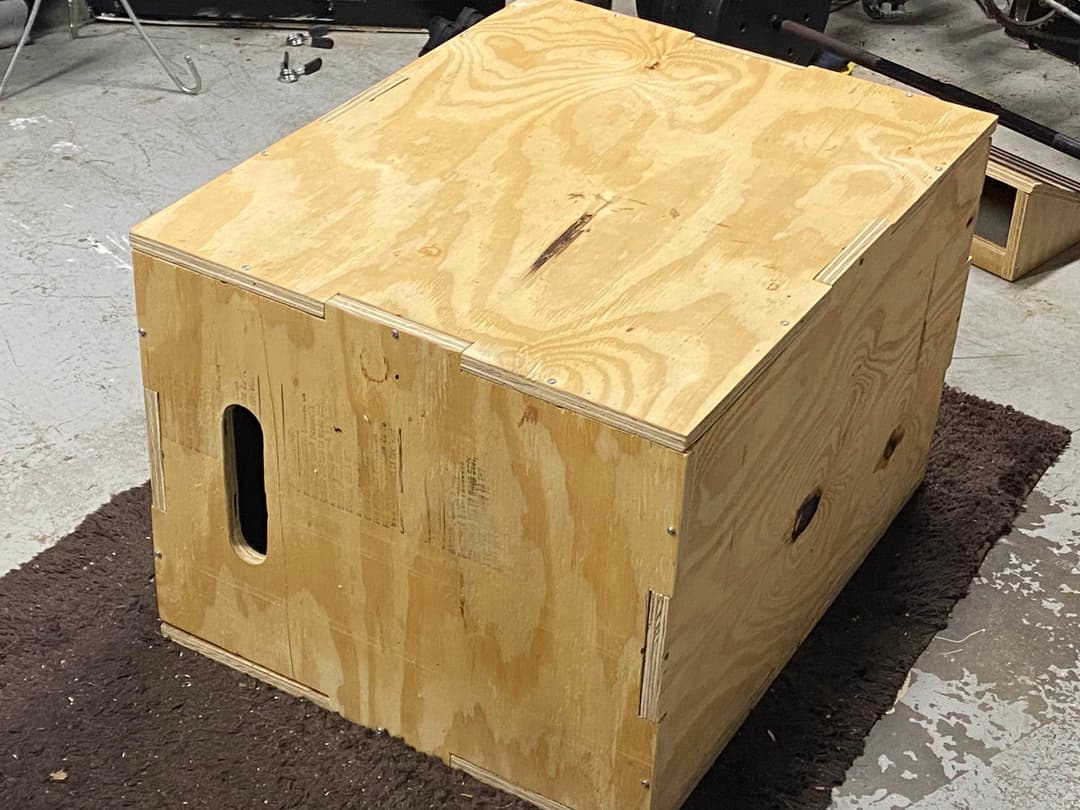
The plyometric box is a simple piece of workout equipment with many uses. They come in different shapes and sizes, and a popular set of dimensions for a box is 20" x 24" x 30", which is what I chose to build. Having three different dimensions allows you to adjust the height of the box to fit your needs. I have wanted a plyo box like this for my home gym for a while and I have been surprised at how useful it has been to me since building it. I use it all the time for workouts and as a support for stretching.
I was surprised at how satisfying and fun the process of making it ended up being too. Once I started the project I was addicted to working on it. A lot of pragmatic work-like tasks create tons of friction with me, a chronic procrastinator, but this totally absorbed my mind and put me in a focused flow state.
To begin the project, I needed a guide. As a total beginner with a small set of tools and resources to do woodworking, I wanted to find an approachable and forgiving set of plans. I watched several videos on youtube and found that I liked this one the best as a guide:
The video shows that you don't need a fancy workshop or the perfect tools and techniques to make a usable box. They outlined all of the steps to make exactly what I was looking for, with tools and materials that were accessible to me. I made some adjustments based on my own materials and preferences and ended up using for my materials:
- 4' x 8' sheet of 3/4" thick plywood
- jigsaw
- sandpaper
- drill
- wood screws
- hole saw
- tape measure
Equipped with my materials, I needed measurements for my cuts. These are the measurement plans I ended up using:

As suggested in the video guide I used, the first step was to buy a piece of plywood from a hardware store and have them cut it into 6 big pieces: two 20" x 24" boards, two 24" x 30" boards, and two 20" x 30" boards. There were also leftover boards that I used for another project. My piece of plywood cost around $40.
I then needed to make these big boards into puzzle pieces, with some boards being "male" and some being "female" on the edges. This interlocking style adds structural support and it looks cool.
I made each male/female notch 6 inches long, measuring 3 inches out from the center of the edge of the board on both sides. I made the notches 3/4ths of an inch thick to match the thickness of the plywood, so when a male notch lies on top of a female notch it fills in the missing space perfectly. This step was more time consuming than I expected. I got confused which edges were male and which were female several times and had to meticulously follow my plans. Making precise measurements and trying to draw perfectly straight lines with a pencil on rough wood was also a challenge.
Once I had my boards all marked up with pencil guides for all of my puzzle piece cuts I used a jigsaw to follow my lines and make the cuts. This was my first time ever using an electric saw and while it was quite violent and loud it was pretty intuitive. I don't have a sawhorse so I was making my cuts on a small patio table with a dumbbell on top to keep the boards steady. It generated a ton of sawdust which I had to clean up also.
Next I had to create the handles to make moving the box around easier. To do this I drilled two holes below the top of the 20" side on both of the 20" x 24" boards. The centers of the holes were 6 inches apart (like the notch above it) and 5 inches below the top edges. I used a hole drill bit attachment which bore into the wood and dug out a little disk, creating a circular hole. Then, to finish the handles I connected the holes with straight line cuts with the jigsaw.
Then I put my puzzle together. My boards weren't perfectly measured and cut so it took a little coercing to get them to fit together well. It was kind of like putting up a house of cards and it took a couple of tries to keep everything from falling apart while I was putting it all together. This part was a little nerve wracking as I wondered if I made any errors that would make my pieces impossible to work with. Once the pieces locked in though, I felt immense relief and pride in my work. Very satisfying.
Then I had to screw it all together. I learned during this process that you should countersink where you are going to drill in screws to avoid splitting the wood. This just meant using a drill bit that created a hole for a screw to follow into the wood. I went around the box drilling holes in the center of every "male" notch and edge, connecting them into the perpendicularly aligned boards next to them. I then drilled the long wood screws into these pre-drilled holes. My boards weren't aligned perfectly so there are parts where the screws are visible between the boards which isn't ideal, but the boards are all still connected and I haven't had any problems jumping all over the box.
Finally, I needed to smooth out the pointy parts of the box, especially on the edges, to make the box more comfortable and safe to use. I don't have a planer, so I used sandpaper that I vigorously rubbed the box with until I was satisfied with its texture.
To confirm that I was all done, I made sure it could support weight and didn't feel shaky by testing its structural integrity. I slowly built up the confidence to jump up on it and landed safely supported by my box. All done! I now have a plyo box that I built with my own hands!
In summary, the steps I followed to create my plyometric box were:
- Find the right plywood at a hardware store and have them make the big cuts for your 6 boards.
- Measure and draw out notches on the edges with a pencil for the puzzle piece interlocking notches.
- Make puzzle piece cuts with a jigsaw.
- Use a hole saw to drill the edges of your rounded handles.
- Use a jigsaw and connect the holes to create handholds.
- Make sure all pieces fit together. Fit them like a puzzle to create your box shape.
- Countersink where you are going to drill in screws to avoid splitting the wood.
- Drill in screws to connect the boards together.
- Sand the edges and anything else that looks pointy.
Some things I learned:
- The tools you use make a very big difference and can make things much easier or much harder. I used a battery powered drill that was a major headache. It is old and ran out of juice extremely quickly so I had to keep charging it over and over in the process of building my box. Don't do that.
- Seemingly small errors can lead to wonky results. Be sure to make straight measurements and cuts and line things up as well as you can.
- Be sure to avoid inhaling sawdust as well by wearing a mask, which I didn't think to do.
- The videos online make the process look like a breeze. This was definitely time consuming and required a lot of care and attention for a beginner like me.
I use this box all the time now and it feels great to use something I built with my own two hands. I have gained an appreciation for carpentry, carpenters, and woodworkers after getting the hands-on, visceral experience of trying it myself. Completing my first ever DIY project was extremely rewarding and I look forward to doing more.